应用场景
在后端系统中,可能需要支持数据导出为xlsx文件的功能,当数据量很大时,如果先创建文件,然后通过HTTP接口进行下载,则在文件生成前,浏览器端会出现下载已经开始,但是没有任何数据传输的情况,用户体验很差,而且在服务器端要浪费磁盘空间和CPU时间来进行文件打包,下载完成/中断后还需要删除临时文件。
类似的情况还有数据打包操作,比如在网盘应用中,用户希望一次性下载多个文件,而浏览器可能会拦截除第一个外的其他文件下载,也会导致用户体验变差。在百度网盘和google drive中,当需要下载一个目录时,会将这个目录打包为一个zip文件后再下载,从而规避浏览器的这个限制。
xlsx文件格式
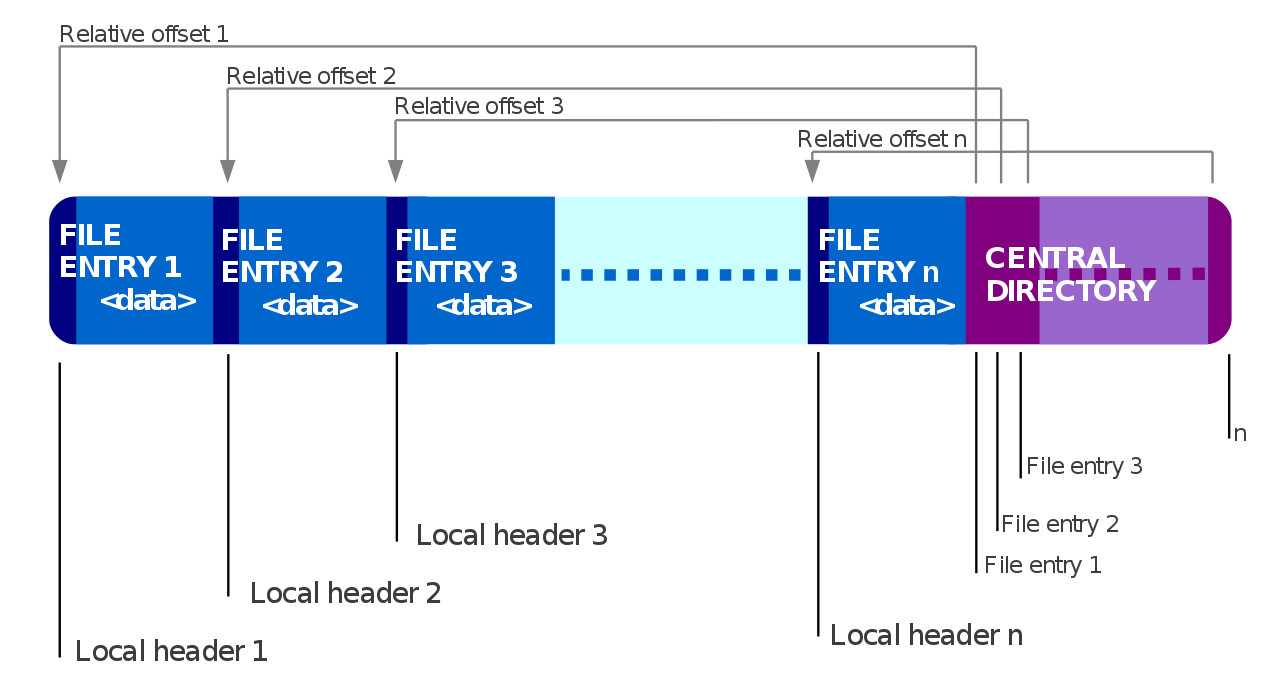
要想生成xlsx文件,需要了解其文件格式,根据Ecma Office Open XML Part 2可知,xlsx是一个zip文件,所以我们先来看看zip文件格式。
zip文件格式简介

从上图可以看出,zip文件格式分为多个文件记录和central directory两部分。文件记录包括local file header和文件内容(还可以包含可选的data descriptor和encryption header)。文件记录可以分布在zip中的任意位置,文件记录之间可以有空隙。在zip文件最后有一个central directory来指明文件记录在zip中所在位置。
之所以采用这种布局,是为了支持:
- 生成流式zip文件
- 添加新文件不需要重新打包旧的文件,只需要在文件结尾处添加新文件并重新生成新的central directory
- 在zip文件头添加其他数据,如自解压头
- 在其他文件中嵌入zip文件
上面的图中还有一个重要的部分没有绘制出来,就是data descriptor,根据zip format SPEC:
 1
 2
 3
 4
 5
 6
 7
 8
 9
10
11
12
13
14
15
16
17
18
19
20
21
| [local file header 1]
[encryption header 1]
[file data 1]
[data descriptor 1]
.
.
.
[local file header n]
[encryption header n]
[file data n]
[data descriptor n]
[archive decryption header]
[archive extra data record]
[central directory header 1]
.
.
.
[central directory header n]
[zip64 end of central directory record]
[zip64 end of central directory locator]
[end of central directory record]
|
我们可以看到一个文件记录最开始是一个local file header,后面是可选的encryption header,接下来是文件内容,最后是一个可选的data descriptor。data descriptor就是用于支持流式zip文件生成而必须的部分。
文件记录
下面我们详细说明一下文件记录中的各个组成部分:
- local file header
 1
 2
 3
 4
 5
 6
 7
 8
 9
10
11
12
13
14
| local file header signature 4 bytes (0x04034b50)
version needed to extract 2 bytes
general purpose bit flag 2 bytes
compression method 2 bytes
last mod file time 2 bytes
last mod file date 2 bytes
crc-32 4 bytes
compressed size 4 bytes
uncompressed size 4 bytes
file name length 2 bytes
extra field length 2 bytes
file name (variable size)
extra field (variable size)
|
- data descriptor
1
2
3
| crc-32 4 bytes
compressed size 4 bytes
uncompressed size 4 bytes
|
可以看到,在local file header和data descriptor中都包含了crc-32、compressed size和uncompressed size。
为什么要重复记录呢?当文件内容是实时生成的时候,这三个值都是无法预先知道的,只有在写入完成后才能得到。因此在生成流式文件的时候:
- 在写入的local file header中设置general purpose bit flag的bit 3为1,指明这三个值需要从data descriptor中读取,并将其值都设置为0;
- 写入数据,同时计算crc-32,记录compressed size和uncompressed size;
- 将正确的crc-32、compressed size和uncompressed size写入data descriptor中;
- 将所有写入文件的偏移写入到central directory中,完成文件传输。
当需要写入的文件已经存在时,我们甚至可以预先计算好文件对应的crc-32值,当生成流式zip文件时,compression method字段采用store(0)模式,这种模式下文件数据不压缩,compressed size和uncompressed size大小一致。此时,zip文件中所有数据的位置和值都是可以预先确定的,从而支持断点续传和多线程下载流式zip文件,具体实现可以参考nginx zip module。这种方式可以用于在网盘应用中下载包含多个文件的zip包,
xlsx文件内容
简单来说,xlsx就是一个包含多个xml文件的zip包,其中大部分是固定内容的xml文件。我们可以新建一个空的xlsx文件,unzip后就能看到其中的文件:
- _rels/.rels
- docProps/app.xml
- docProps/core.xml
- xl/_rels/workbook.xml.rels
- xl/theme/theme1.xml
- xl/styles.xml
- [Content_Types].xml
- xl/workbook.xml
- xl/worksheets/sheet1.xml
- …
当只有一个工作簿的时候,工作簿数据一般存放在xl/worksheets/sheet1.xml文件。如果需要支持多个工作簿和其他高级功能,需要参考Standard ECMA-376
Office Open XML File Formats。
xl/worksheets/sheet1.xml文件格式如下:
 1
 2
 3
 4
 5
 6
 7
 8
 9
10
11
12
13
14
15
16
17
18
19
20
21
22
23
24
25
26
27
28
29
30
31
32
33
34
35
36
37
38
39
40
41
42
43
44
45
46
47
48
49
50
51
52
53
54
55
56
57
58
59
60
61
62
63
64
65
66
67
| <?xml version="1.0" encoding="UTF-8" standalone="yes"?>
<worksheet xmlns="http://schemas.openxmlformats.org/spreadsheetml/2006/main"
xmlns:r="http://schemas.openxmlformats.org/officeDocument/2006/relationships"
xmlns:mc="http://schemas.openxmlformats.org/markup-compatibility/2006" mc:Ignorable="x14ac xr xr2 xr3"
xmlns:x14ac="http://schemas.microsoft.com/office/spreadsheetml/2009/9/ac"
xmlns:xr="http://schemas.microsoft.com/office/spreadsheetml/2014/revision"
xmlns:xr2="http://schemas.microsoft.com/office/spreadsheetml/2015/revision2"
xmlns:xr3="http://schemas.microsoft.com/office/spreadsheetml/2016/revision3" xr:uid="{A45FA7EE-319C-4F2A-BADD-CBFF345C308D}">
<cols>
<col min="1" max="1" width="20" />
<col min="2" max="2" width="20" />
<col min="3" max="3" width="20" />
</cols>
<sheetData>
<row r="1" spans="1:3" x14ac:dyDescent="0.25">
<c r="A1" t="inlineStr">
<is>
<t>f1</t>
</is>
</c>
<c r="B1" t="inlineStr">
<is>
<t>f2</t>
</is>
</c>
<c r="C1" t="inlineStr">
<is>
<t>f3</t>
</is>
</c>
</row>
<row r="2" spans="1:3" x14ac:dyDescent="0.25">
<c r="A2" t="inlineStr">
<is>
<t>2 1</t>
</is>
</c>
<c r="B2" t="inlineStr">
<is>
<t>2 2</t>
</is>
</c>
<c r="C2" t="inlineStr">
<is>
<t>2 3</t>
</is>
</c>
</row>
<row r="3" spans="1:3" x14ac:dyDescent="0.25">
<c r="A3" t="inlineStr">
<is>
<t>3 1</t>
</is>
</c>
<c r="B3" t="inlineStr">
<is>
<t>3 2</t>
</is>
</c>
<c r="C3" t="inlineStr">
<is>
<t>3 3</t>
</is>
</c>
</row>
</sheetData>
</worksheet>
|
其中,用于说明工作簿有多少列,以及每列的名称;由多个组成,每个代表工作簿的一行,每行由多个cell组成,用表示,为了简单起见,我们使用inlineStr类型来保存数据,数据放在标签中。
根据数据生成流式xlsx文件
要生成流式xlsx文件,首先需要有能够支持流式生成zip文件的库,go和java的标准库都能支持,python的标准库不支持,需要使用第三方库python-zipstream或者ZipStream,C/C++需要自己实现,可以参考nginx zip module。
我实现了一个流式生成xlsx的go版本,供参考。
流式HTTP文件下载
当需要传输文件流时,HTTP的header不发送Content-Length,在发送完headers后,将生成的流式xlsx数据写入socket即可。go的http handler的参数ResponseWriter是实现了io.Writer接口,可以直接写入生成的xlsx文件数据,比较简单,就不写例子了。
 1
 2
 3
 4
 5
 6
 7
 8
 9
10
11
12
13
14
15
16
17
18
19
20
21
22
23
24
25
26
27
28
29
30
31
32
33
34
35
36
37
38
39
40
41
42
43
44
45
46
47
48
49
50
51
52
53
54
55
56
57
58
59
60
61
62
63
64
65
| type Handler interface {
ServeHTTP(ResponseWriter, *Request)
}
type ResponseWriter interface {
// Header returns the header map that will be sent by
// WriteHeader. The Header map also is the mechanism with which
// Handlers can set HTTP trailers.
//
// Changing the header map after a call to WriteHeader (or
// Write) has no effect unless the modified headers are
// trailers.
//
// There are two ways to set Trailers. The preferred way is to
// predeclare in the headers which trailers you will later
// send by setting the "Trailer" header to the names of the
// trailer keys which will come later. In this case, those
// keys of the Header map are treated as if they were
// trailers. See the example. The second way, for trailer
// keys not known to the Handler until after the first Write,
// is to prefix the Header map keys with the TrailerPrefix
// constant value. See TrailerPrefix.
//
// To suppress automatic response headers (such as "Date"), set
// their value to nil.
Header() Header
// Write writes the data to the connection as part of an HTTP reply.
//
// If WriteHeader has not yet been called, Write calls
// WriteHeader(http.StatusOK) before writing the data. If the Header
// does not contain a Content-Type line, Write adds a Content-Type set
// to the result of passing the initial 512 bytes of written data to
// DetectContentType. Additionally, if the total size of all written
// data is under a few KB and there are no Flush calls, the
// Content-Length header is added automatically.
//
// Depending on the HTTP protocol version and the client, calling
// Write or WriteHeader may prevent future reads on the
// Request.Body. For HTTP/1.x requests, handlers should read any
// needed request body data before writing the response. Once the
// headers have been flushed (due to either an explicit Flusher.Flush
// call or writing enough data to trigger a flush), the request body
// may be unavailable. For HTTP/2 requests, the Go HTTP server permits
// handlers to continue to read the request body while concurrently
// writing the response. However, such behavior may not be supported
// by all HTTP/2 clients. Handlers should read before writing if
// possible to maximize compatibility.
Write([]byte) (int, error)
// WriteHeader sends an HTTP response header with the provided
// status code.
//
// If WriteHeader is not called explicitly, the first call to Write
// will trigger an implicit WriteHeader(http.StatusOK).
// Thus explicit calls to WriteHeader are mainly used to
// send error codes.
//
// The provided code must be a valid HTTP 1xx-5xx status code.
// Only one header may be written. Go does not currently
// support sending user-defined 1xx informational headers,
// with the exception of 100-continue response header that the
// Server sends automatically when the Request.Body is read.
WriteHeader(statusCode int)
}
|